Wildstar Leveling Guide 2017
Fastest Way To Level In Wildstar
Flasks and Boosts
Before I go any further, it’s important to mention flasks and other boosts. To get the absolute most out of leveling, you will need to know how to use boosts efficiently.
Guild Enhancements: As often as officers allow.
Guild XP Flask: Pop it before turning in a quest when it runs out. Use this as often as possible.
Flask of Advancement (Store Flask): If you can afford it, use it as often as possible as this flask (3 hour flasks are 250 Protobucks or 115 OmniBits, otherwise gained from Rucksack or Daily Login). If you want to converse these flasks use them before turning in quests, in zones you do not like.
Settler Boost: Always when you see them.
Signature (Subscription): As often as you can afford.
2-Step Verification: Preferably always.
Guild Boosts
First, I would highly advise joining a guild with the XP enhancer and the XP Flasks unlocked. XP flasks from guilds cost Renown (500) and give an 8% boost, and stack with the store bought flasks. To get renown at a lower level, you can either do Expeditions in between quests, or level with a friend. The Guild XP enhancer will need to be activated by an officer. This gives a 10% boost when it is active.
Flasks of Advancement (Store Flasks)
There are two flasks for leveling on the store: Flask of R&R and Flask of Advancement. The Flask of Advancement increases your XP gain by 50% for 1, 3, or 6 hours (And do not tick when you log off the current character) and can be bought in packs of 5. Flasks of Advancement are definitely worth the purchase. Keep in mind you receive 1 free Flask of Advancement from the “Protostar’s Revolutionary Rucksack” and you may receive them as a login reward. Personally, I can level a character with a 5 pack of the 3 hour potions, but you can adjust the amount based on how often you play, and how much questing you want to do. With the flasks, you can skip a decent chunk of each zone, which after your second character is definitely worth doing. Flasks of R&R tend to not be worth it, as they just restore your rest XP. Unless you intend to pull an all-nighter, I personally can’t recommend buying them and better to use them from Daily Login Reward.Signature Account (Subscription Boost)
A sub offers an extra 25% boost to XP, and accelerates the rate at which you earn rested XP. Along with some of the other perks, such as the extra OmniBits, it’s likely worth the money. If you don’t want to buy a subscription, check the price of CREDD. If this is your first character, you probably won’t be able to afford this, but it’s worth a look.2-Step Verification Boost
If you add a free authenticator to your account, you get a free 5% boost to XP. Unless you have issues with the authenticator, it’s worth adding and you get a free mount.Settler Boosts
Occasionally you may stumble across XP boosts activated by the Settler path. If you come across one of these, use it. In general, if you see a settler’s boost active, using it can only help. You’ll find it’s either a 10 minute or 20 minute buff.XP Weekends
Periodically Carbine will announce Double XP Weekends which drastically increase the speed at which you level. If one is active, this is definitely the best time to level that alt.When to Use What
Guild Enhancements: As often as officers allow.
Guild XP Flask: Pop it before turning in a quest when it runs out. Use this as often as possible.
Flask of Advancement (Store Flask): If you can afford it, use it as often as possible as this flask (3 hour flasks are 250 Protobucks or 115 OmniBits, otherwise gained from Rucksack or Daily Login). If you want to converse these flasks use them before turning in quests, in zones you do not like.
Settler Boost: Always when you see them.
Signature (Subscription): As often as you can afford.
2-Step Verification: Preferably always.
Questing
Generally speaking, questing is the most efficient way to level. Adventures, Dungeons, and PVP instances do give decent chunks of XP, but never pop often enough to be worth doing at lower levels. Expeditions do give a nice chunk of XP the first run through from their quests, but after that tend to give less than adequate XP.
When leveling, you should always be in zones 3 levels higher than your current level, preferably doing quests 3 levels above you as well. Some zones may have limited quests in the 3 levels above you category, so you will probably want to finish up quest chains before moving on to the next in a zone, unless the current chain has it’s recommended level equal to, or lower than, your current level. If you are leveling a stalker and find yourself having too many issues in stealth, you may want to try killing mobs of a lower level, if required. Other classes shouldn’t have many issues with this, so long as you don’t over pull mobs, use appropriate class builds, and avoid pulling group mobs. Adjusting your spec to have more survivability may be necessary in some situations, but for the most part, 3 levels above shouldn’t cause too many issues. Please note that there are 3 exceptions. Arcterra can only be entered at level 48, and Crimson Badlands can only be entered at level 49, even though these zones are for level 50s. In addition, Grimvault tends to be easier if you enter at level 44. The zone list below shows the optimal level ranges for each zone.
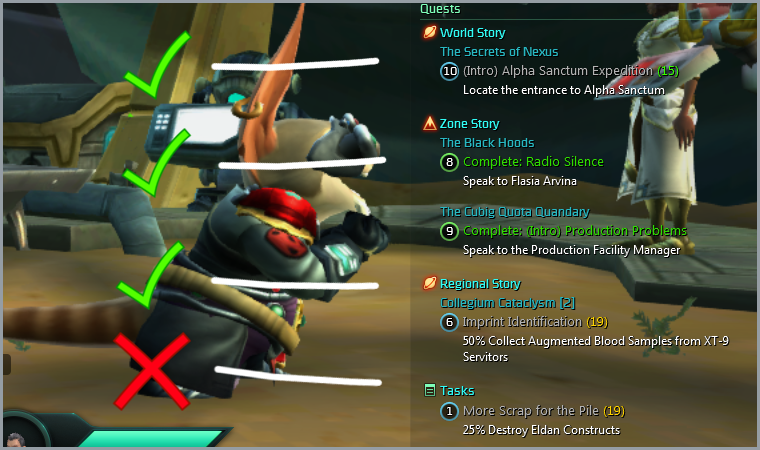
While leveling, you should only be doing quests labeled as “Story” Quests, whether they are World, Zone, or Regional Story quests. Do not do Task quests while leveling, with only 3 exceptions: While in Grimvault (Optional during XP weekends, and if you intend to go to Arcterra at level 48), while in Arcterra or Crimson Badlands, and if progress on the Task quest is earned automatically while doing a Story quest. Challenges can be skipped unless they’re part of a quest, as they tend to give minimal experience and rewards. The diagram shown below will illustrate the difference between these quests on the Objective Tracker.
Path Missions can be avoided entirely while leveling, unless it can be done while doing quests. For example, Scientist missions generally just require you to use your scanbot for everything. Settler Missions can be done while leveling if you wish to give yourself the XP boosts, but it isn’t worth going out of your way for them. You best bet tends to be waiting until you are level capped to do your path. It is worth noting, once your path is capped, Path XP is converted into normal XP, but this likely won’t happen until you hit max level zones anyway. You will eventually need to level your path for the AMP and Tier boosts you earn from them, so do keep this in mind as well. Paths cap at level 30, which is the same point you earn the Tier point from it.
Professions tend to be useless in general, aside from the gathering Professions (Relic Hunter, Mining, and Survivalist), Architect (if you do housing), technologist (if you intend to raid), and cooking (which doesn’t NEED to be leveled, and doesn’t count as a normal profession). I wouldn’t advise doing non-gathering professions until max level. Gathering professions can usually be done with little extra effort while leveling, and can either give you a VERY minor cash boost, or give you extra materials for when you actually intend to craft at max level. If you don’t know what professions you want to take, I would suggest taking up Survivalist, as it causes extra materials to drop from normal mobs, but it doesn’t actually speed up the leveling process in any way. Overall, professions will slow you down, and tend to be useless for pre-50 content, and are even useless in level 50 content in many cases, so they can be safely avoided.
For levels 1-48, follow the zone guide below. Please note that skipping the tutorial will likely yield a faster leveling experience, but cannot be skipped if you’re new to the game. Do not pop level boosters during the tutorial, if you choose to do it and recommend to start using boosters when you reach the level 6-13 zones.
When you hit level 48, you can go to the zone Arcterra and do Dynamic Events and the “Pillars of Kel Havik” event for quick bonus XP, then move to Crimson Badlands. Alternatively you can finish questing in Grimvault, and will only NEED to do this if you run out of quests before level 49.
When you hit level 49, you will likely run out of quests in Grimvault, and will not gain as much XP in Arcterra, so you should move to Crimson Badlands and do the introduction quest, and the dailies in that zone at this time.
Arkship/Tutorial: 1-3 Optional unless this is your 1st Character.
Levian Bay [Dominion], Crimson Isle [Dominion], Northern Wilds [Exile], or Everstar Grove [Exile]: 3-5 (Required)
Deradune [Dominion], Ellevar [Dominion], Celestion [Exile], or Algoroc [Exile]: 6-13 (6-10)
Auroria [Dominion] and Galeras [Exile]: 14-21 (11-19)
Whitevale: 22-28 (20-25)
Farside: 29-34 (26-31)
Wilderrun: 35-40 (32-37)
Malgrave: 41-45 (38-42)
Grimvault: 46-49 (43-47)/(43-48)
Arcterra: (48)
Crimson Badlands: 49
When leveling, you should always be in zones 3 levels higher than your current level, preferably doing quests 3 levels above you as well. Some zones may have limited quests in the 3 levels above you category, so you will probably want to finish up quest chains before moving on to the next in a zone, unless the current chain has it’s recommended level equal to, or lower than, your current level. If you are leveling a stalker and find yourself having too many issues in stealth, you may want to try killing mobs of a lower level, if required. Other classes shouldn’t have many issues with this, so long as you don’t over pull mobs, use appropriate class builds, and avoid pulling group mobs. Adjusting your spec to have more survivability may be necessary in some situations, but for the most part, 3 levels above shouldn’t cause too many issues. Please note that there are 3 exceptions. Arcterra can only be entered at level 48, and Crimson Badlands can only be entered at level 49, even though these zones are for level 50s. In addition, Grimvault tends to be easier if you enter at level 44. The zone list below shows the optimal level ranges for each zone.
While leveling, you should only be doing quests labeled as “Story” Quests, whether they are World, Zone, or Regional Story quests. Do not do Task quests while leveling, with only 3 exceptions: While in Grimvault (Optional during XP weekends, and if you intend to go to Arcterra at level 48), while in Arcterra or Crimson Badlands, and if progress on the Task quest is earned automatically while doing a Story quest. Challenges can be skipped unless they’re part of a quest, as they tend to give minimal experience and rewards. The diagram shown below will illustrate the difference between these quests on the Objective Tracker.

Path Missions can be avoided entirely while leveling, unless it can be done while doing quests. For example, Scientist missions generally just require you to use your scanbot for everything. Settler Missions can be done while leveling if you wish to give yourself the XP boosts, but it isn’t worth going out of your way for them. You best bet tends to be waiting until you are level capped to do your path. It is worth noting, once your path is capped, Path XP is converted into normal XP, but this likely won’t happen until you hit max level zones anyway. You will eventually need to level your path for the AMP and Tier boosts you earn from them, so do keep this in mind as well. Paths cap at level 30, which is the same point you earn the Tier point from it.
Professions tend to be useless in general, aside from the gathering Professions (Relic Hunter, Mining, and Survivalist), Architect (if you do housing), technologist (if you intend to raid), and cooking (which doesn’t NEED to be leveled, and doesn’t count as a normal profession). I wouldn’t advise doing non-gathering professions until max level. Gathering professions can usually be done with little extra effort while leveling, and can either give you a VERY minor cash boost, or give you extra materials for when you actually intend to craft at max level. If you don’t know what professions you want to take, I would suggest taking up Survivalist, as it causes extra materials to drop from normal mobs, but it doesn’t actually speed up the leveling process in any way. Overall, professions will slow you down, and tend to be useless for pre-50 content, and are even useless in level 50 content in many cases, so they can be safely avoided.
For levels 1-48, follow the zone guide below. Please note that skipping the tutorial will likely yield a faster leveling experience, but cannot be skipped if you’re new to the game. Do not pop level boosters during the tutorial, if you choose to do it and recommend to start using boosters when you reach the level 6-13 zones.
When you hit level 48, you can go to the zone Arcterra and do Dynamic Events and the “Pillars of Kel Havik” event for quick bonus XP, then move to Crimson Badlands. Alternatively you can finish questing in Grimvault, and will only NEED to do this if you run out of quests before level 49.
When you hit level 49, you will likely run out of quests in Grimvault, and will not gain as much XP in Arcterra, so you should move to Crimson Badlands and do the introduction quest, and the dailies in that zone at this time.
Zone List
These are all the zones you will encounter, along with their recommended levels and their optimal levels in parenthesis. The parenthesis format is the level you should go to the zone to the last level you should spend in that zone.Arkship/Tutorial: 1-3 Optional unless this is your 1st Character.
Levian Bay [Dominion], Crimson Isle [Dominion], Northern Wilds [Exile], or Everstar Grove [Exile]: 3-5 (Required)
Deradune [Dominion], Ellevar [Dominion], Celestion [Exile], or Algoroc [Exile]: 6-13 (6-10)
Auroria [Dominion] and Galeras [Exile]: 14-21 (11-19)
Whitevale: 22-28 (20-25)
Farside: 29-34 (26-31)
Wilderrun: 35-40 (32-37)
Malgrave: 41-45 (38-42)
Grimvault: 46-49 (43-47)/(43-48)
Arcterra: (48)
Crimson Badlands: 49
Notes
That is it for this guide! I will make adjustments depending on changes. You can always check the blog at roguegarr.wordpress.com for the same guides and updates. Please rate this guide if you find it useful! You'll make the quest garr happy.
Leveling Guide for Exiles & Dominion
Leveling in WildStar can be slow if you don’t know where to go or what to do next. The following text is a very brief, straightforward, leveling guide, that includes mob levels for each Exile and Dominion map, and provides a list of unlocks available at certain levels. We recommend that you thoroughly read leveling tips listed below this table, because they point out what you should focus on while leveling.
Once you ding level 50 check out our guide What to do at level 50?
Important notes:
- If you activate WildStar Two-Step Verification you’ll get Progression Boosts: 2% Increase to Experience, Renown, and Prestige gain
- Stormtalon’s Lair, Ruins of Kel Vorath, Skullcano and Sanctuary of the Swordmaiden dungeons can be walked into 3 levels earlier, but cannot be queued for in the group finder until the listed level. You have to discover their entrance first.
| MOB LEVEL | DOMINION MAPS | EXILES MAPS | ADDITIONAL UNLOCK |
|---|---|---|---|
| 1-3 | Arkship | Arkship | |
| 3-6 | Levian Bay Crimson Isle |
Everstar Grove Northern Wilds |
|
| 6-12 | Deradun | Algoroc |
|
| 6-14 | Ellevar | Celestion |
|
| 14-22 | Auroria | Galaras |
|
| 22-28 | Whitevale | Whitevale |
|
| 28-36 | Farside | Farside |
|
| 35-40 | Wilderrun | Wilderrun |
|
| 40-44 | Malgrave | Malgrave |
|
| 46-48 | Western Grimvault | Western Grimvault | |
| 46-50 | Southern Grimvault | Southern Grimvault |
|
General Leveling Tips
- Do not skip any mobs. Constantly grind your way from Quest start, to questing area.
- Always have some direct healing medpacks in your inventory – you are going to use them. A lot.
- Put 1 knockback/knockdown on your bar. Interrupting mobs cast causes your abilities to deal increased damage for a short period, next to saving you from fairly high damage abilities.
- Once you hit level 14 and get a house, always sign out while in your house to get rest XP.
- There is an exp bonus board inside the personal housing zone. The buff cycles from 10% to 5% depending on the day and it lasts 24 hours. It is worth the small amount of time spent to pick up the buff. Once the buffs’ duration expires, the buff can be reapplied from the board.
- Make sure to create an alt and get it into an area with a mailbox. This way you can extend your own inventory without having to hit the bank as often. It took about 25 minutes to blaze through the arkship and the first island from 1-6 level if you don’t do all challenges. 25 minutes early in the game will save you several hours of time teleporting back and forth from the main town.
- It also sets you up to not be broke at 50 because you will be sending things to your alt that you will want to sell, instead of just blindly vendor and salvaging it all in order to keep your bag room up.
- Keep both a support and assault set as much as possible while leveling so you can queue as both support and DPS for instances. Also the first time you hit a 3-5 man quest try and add anyone in your group that seems competent to friends. Being able to grind 2-4 levels in a dungeon helps to take a bit of the monotony out of the normal grind.
- If you focus on fast leveling for later PvPing, spend some time in the pvp queue, because of the way gear is currently rewarded in game. Spending 5-10 hours in pvp could provide a ton of long term benefit, even if it temporarily stymies your leveling progression!
- For Fast Leveling take Settler or Soldier as your path. Settler is the only path in the game where you gain the items needed to use its abilities from just killing mobs. It also gives you a portable sell station, so you can empty your inventory with less need to run back to a hub or station. Soldier gets special weapons for completing Swat missions that allows you to defeat mobs pretty fast.
- If you focus on leveling through PvP, you will not have enough money to buy a mount on level 15 for 10 gold. The first mount available for PvP currency Prestige is available on level 25.
- If you can, level with a friend.