Wildstar Tradeskills Guide 2017
Tradeskills are trade-oriented skills that players can learn to gather resources and create items. Each character can have 2 active tradeskills starting at level 10. Hobbies and other skills do not count against this limit.
Gathering tradeskills
Mining
The Miner excavates precious ores, crystals and gems to be used by the Weaponsmith, Armorer and Architect.
Relic Hunter
The Relic Hunter excavates omni-plasm and Eldan relics used by the Technologist, and the Weaponsmith. Some of the most powerful items on Nexus may require Eldan Relic Parts.
Survivalist
The Survivalist skins leather and cuts meat from creatures. They also harvest wood from trees with a laser chainsaw. Best paired with the Outfitter or Architect.
Production tradeskills
Architect
The Architect shapes FABkits, decor items and war plot deployables. The Architect is best paired with a heavy dose of patience, tons of resources, and the Survivalist...possibly a Miner. Also Farming... and on rare occasions, Relic Hunter.
Armorer
The Armorer forges heavy armor and combat shields, then powers them with microchips and power cores. This tradeskill is best paired with Mining.
Outfitter
The Outfitter uses Leather, pelts and bone to craft medium armor and support systems, then powers them with microchips and power cores. This tradeskill is best paired with the Survivalist.
Tailor
The Tailor uses cloth gathered from humanoids to craft light armor. This tradeskill is best paired with Survivalist.
Technologist
The Technologists creates medical supplies, stat boosting potions, and field technologies from combining omni-plasm with herbs and produce. Refurbishes Eldan relics to craft gadgets. Best paired with Relic Hunter.
Weaponsmith
Weaponsmithing is the art of forging weapons and weapon attachments, then powering them with microchips and power cores. This tradeskill is best paired with Mining.
Hobbies
Cooking
Cooks use produce and meats to whip up delicious delicacies. By mixing different ingredients at cooking stations, cooks can discover recipes that provide all kinds of benefits and buffs.
Farmer
Farmers collect herbs, seeds, and produce by attacking various plants. The resources can be used for crafting and the seeds can be planted in a garden in player housing.
Other
Runecrafting
Runecrafting is an item enhancement system. Players can create runes to place into open rune slots in their gear. Runecrafting is available to all players at level 15.
Salvaging
Salvaging is a process by which players break down items into their basic components, providing materials to use for crafting. Salvaging is available to all players at level 8.
WildStar Tradeskills Guides
Thinking about WildStar Crafting professions as collecting materials and clicking a button, will lead you the wrong way. WildStars announced tradeskills as a mini-game, which offers gear creation and customization by mixing and matching different ingredients. Often the best items you can get will require components from various other sources in order to unlock their maximum potential. Apart from a large variety of tradeskills, WildStar also offers hobbies that everyone can take, no matter what tradeskills you have already chosen.
When can I start crafting?
At level 10 you will receive Datachron call, giving you the Crafting for the Dominion in Ellevar or Crafting for the Dominion in Deradune, and for Exile Crafting for the Exiles in Algoroc or Crafting for the Exiles in Celestion quest where you have to visit the tradeskill hub and learn tradeskills. There are 9 tradeskills in WildStar – 6 crafting and 3 gathering, and 2 hobbies. You can only have 2 tradeskills at the time, while the number of hobbies is not limited. Some tradeskills pair well with others, but you are free to pick whatever your heart desires.
Crafting Respecing
Players who visit the Tradeskill Trainer and select a new Tradeskill will be given the option to swap a current Tradeskill out for a new one. Tradeskills you learned can be swapped for another one, but you will get a cooldown timer (the more you develop it – the longer cooldown you’ll have). It’s free the first time you do it, but you have to pay a fee for any subsequent swap (the fee depends on your tradeskill level). Your tradeskill progress is saved when you abandon it, so it is possible to switch back and continue where you stopped.
Crafting Recipes
The recipes you start with in a particular tier (novice, apprentice …) generally have “Serviceable” in their names. After using the same recipes several times, you’ll gain recipes that starts with Fine. These two recipes use the exact same mats, but the “Fine” items have better stats and sell for more.
Crafting in WildStar
There are two types of crafting:
COORDINATE CRAFTING
Coordinate uses grid screen for crafting. Items crafted this way often have different locked variants. Those are either somewhere on the grid, or hidden in the colored area. You have to use maximum of 3 additives to target them (you can’t remove additives them once you use them). If they are hidden, every attempt will notify you how close you are to discover the hidden item. Crafting basic items doesn’t require any additives.
CIRCUIT BOARD CRAFTING
Circuit Board Crafting is conducted through, well, the circuit board screen. In the middle of the screen you choose and put ability microchips into sockets (there may be one or more); bellow them you can click and increase/decrease stats count. Often, one of the sockets is randomly assigned and locked when you start crafting. You can’t replace it or change its stat count. Abandon the craft or continue and salvage this item for materials. On the bottom of the screen is the power output bar. Increasing stats count increases power output. Going over the number displayed on the bar increases chances for crafting to fail (you can see fail chance percentage next to the bar). Matching the chip color and the socket color reduces the power output per one stat increase. Power Cores, put in the socket at the top of the screen, increase power output capacity, depending on their quality. The color of the core will be the color of the item (green core –green item, blue core – blue item).
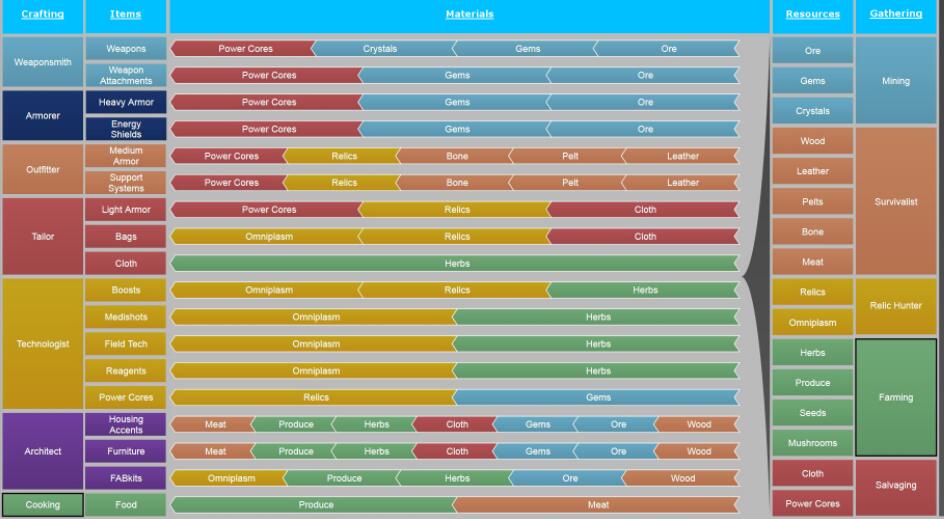
List of Crafting Professions
- Weaponsmith (Circuit Board Crafting) – Weaponsmiths forge deadly weapons and weapon attachments powered by microchips and power cores. This tradeskill pairs well with the Miner.
- Armorer (Circuit Board Crafting) – Armorers forge heavy armor and combat shields powered by microchips and power cores. This tradeskill pairs well with Miner.
- Outfitter (Circuit Board Crafting)– Outfitters fashion medium armor and support systems powered by microchips and power cores. This tradeskill pairs well with Survivalist.
- Tailor (Circuit Board Crafting) – Tailors fashion light armor out of cloth gathered from enemy humanoids. Tailors can also acquire cloth by trading with friends or visiting the commodities exchange. This tradeskill pairs well with any gathering profession.
- Technologist (Coordinate Crafting) – Technologists formulate medical supplies, stat boosting elixirs, and field technologies by combining omni-plasm with herbs and produce. They also refurbish Eldan relics to craft gadgets. This tradeskill pairs well with Relic Hunter.
- Architect (Coordinate Crafting)– Architects shape FABkits, decor items, and warplot deployables. Because it requires a healthy dose of patience and a ton of resources, Architecture is best left to the enterprising adventurer. This tradeskill pairs well with Survivalist, and is supplemented by Miner, Farmer, and occasionally Relic Hunter.
List of Gathering Professions
Everyone can gather crafting materials by attacking the resource nodes. Salvaging also provides crafting materials. But, that yields very low amount of materials, compared to harvesting with gathering tools – Relic Blaster for Relic Hunter, Laser Chainsaw for Survivalist and Laser Pickaxe for Mining. Harvesting with those tools collect materials faster as well. Resource nodes will show up on your map once you get a gathering skill. Harvesting tools can be bought from Tradeskill vendors, and come in 5 tiers (Novice, Apprentice, Journeyman, Artisan, and Expert)
- Mining – Miners extract precious ores, crystals and gems from the earth. This tradeskill pairs well with Weaponsmith, Armorer, or Architect.Mining with a twist. Nodes can turn into creatures and run away/attack you, or open a tunnel with more nodes (you have limited time to mine them before the tunnel collapses).
- Survivalist – Survivalist skin animals and butcher them for meat. They also harvest wood by felling trees with a laser chainsaw. This tradeskill pairs well with Outfitter or Architect.You have to salvage certain items obtained from animals to receive Survivalist materials (check the item tooltip when you loot it).
- Relic Hunter – Relic Hunters excavate omni-plasm and Eldan relics from ancient ruins. This tradeskill pairs well with Technologist, but also supplements most other crafting professions because some of the most powerful items often require Eldan relic parts.
Hobbies
- Cooking (Coordinate Crafting) – Cooks prepare succulent dishes from the exotic flora and fauna native to Nexus. Cooked meals give you various buffs and restore your HP and focus while eating. There are cooking vendors in every zone, selling various recipes. Use a cooking table to create food.
- Farming – Everyone gets it once they build a house and a garden. Plants drop seeds next to crafting materials when you “kill” them, and you just plant those seeds in your garden (select one of the spots in your garden and right click on the seed in your inventory). Now you just have to wait for them to grow and harvest them when they do.
- Fishing – rumor has it Fishing will be implemented post-launch. We just have to wait and see.
Tradeskills UI tabs
Tradeskills UI consists of three tabs Schematics, Tech Tree and Talents. Default key for opening Crafting UI is (K).
Schematics – You can find all your crafting skill recipes (cooking ones too) here. Select a crafting skill on the left side of the screen and it will list recipes divided into categories. You have two filters above the list – “Show locked” where you can see recipes you don’t know yet, and “have materials” to list only recipes for which you have materials to craft. Selecting a recipe will display materials required and possible variants of that recipe.
Tech Tree – Crafting skill related achievements are located here. Most of them unlock recipes when you complete them, and some even give talent points. Click on the blue bordered Tech Tree tab to list tiers for every crafting skill you have, including Cooking. You can see your current Tradeskill experience and experience needed to unlock the next tier on that list. Every crafting skill has five tiers – Novice » Apprentice » Journeyman » Artisan » Expert, and every tier has its own sub-tab with its own achievements. You can click on every achievement to check its requirements and awards. Achievements awarding talent points have a star on them. You can even go directly to the crafting screen if the achievement requires some item crafted, just click on the item name. Some achievements are available only after you complete those above – there are lines connecting them.
Talents – Talents grant bonuses to the tradeskill you learned. Talent points are gained by completing Tech Tree achievements marked with a star. There are different talent levels and you can pick only one per level (only one of level 1 talents, only one of level 2 talents…). Level 1 talents require 4 talent points, level 2 talents require 8 talent points, level 3 requires 10 talent points… You pay in crafting vouchers to reset talent points (vouchers are awarded for completing daily crafting quests). Talents only improve the items you craft.
Tradeskills Tips and Tricks
- Salvaging starts at level 6, and this process can give you materials you need from other gathering professions – heavy armor/weapons for ore, medium armor for leather, light for cloth, and all of them can give you Power Cores. Click on an item you want to salvage and drag it over the salvage button in your inventory. The item will be destroyed in this process.
- Complete daily crafting quests obtained from Work Order Boards. Those boards are always near crafting hubs in villages and towns, and they have a yellow hammer icon above them. Crafting dailies provide a lot of tradeskill experience, crafting vouchers and some tradeskill achievements require of you to complete them. Crafting vouchers are used to purchase bags with crafting materials and some various crafting items from Research Commissioner Tyranea, Illium; and Brigade Researcher Seagarden, Thyd (both are near Work Order Board). Vouchers are used to reset crafting talents as well.
- You have separate storage for crafting materials. Open your inventory and click on a hammer button to access it.
- You can buy limited amounts of materials from Vendbots at crafting hubs.
- Tradeskill recipes are dungeons/adventures and world drops; some vendors sell them too.
- Default bind for the Tradeskill tab is (K).
- Crafters can make PvE and PvP gears, but if you are a skilled crafter you can get some way to make PvE gear a little better focused for PvP and vice versa.
Schematics, Tech Tree and Talents
When you bring up your tradeskill window (press L) from the Codex, there are three tabs from left to right: Schematics, Tech Tree and Talents.
Schematics
This section of the tradeskill window contains a list of known and learned schematics for the specific Tradeskills you have activated. As you will notice from the screenshot above the user interface informs you of what tradeskill you have and below that, the schematics linked it to. If you’ve taken a hobby, those will be listed here also. It’s possible to search for specific schematics and refine further to recipes you ‘have materials’ for. If you’ve the necessary materials to craft an item you simply choose it from the list and press ‘craft’.
Tech Tree
Here’s where crafting in WildStar gets interesting. This option is where you can review your crafting progress based on the specific tradeskill you have, including your achievements and the rewards for reaching them. The basic premise of leveling up your specific tradeskill is to follow the Tech Tree all the way to the bottom, undertaking what it asks you in order to acquire experience and to unlock further advancement. In the image shown Omni-Plasmic Bioreactions is selected and you will note it is 1 of 3 (completed) with the experience bar at around 25%. The highlighted tooltip states:
“Craft 3 batches of Basic Medishots: Instant healing to learn how to make Spirovine Extract samples.”
Simply put, if you construct a handful of Basic Medishots you’ll complete this schematics progress which will allow you to construct Spirovine Reactions (the schematic below Omni-Bioreactions). If you level up a schematic that has a star on it (see image again) it will also provide you with a talent point when levelled. If a schematic is by itself with no links to other nodes these can be completed at any time.
Talents
Once you’ve acquired some Talent Points you can switch over to the Talents tab. Here you can spend those talent points. As you’ll see from the picture, it looks relatively complicated at first but it’s quite simple. You spend points in each tier with each tier then providing a bonus to that craft. For the first tier it takes 4 Talent Points to unlock it, while the second tier takes 8. The known tier benefits are below for crafting only tradeskills (gathering variants are excluded):
Weaponsmith
- Level 1 - XP gained from crafting successes / failures increased by 5% and charges of Special Ability Chips cost 6% less.
- Level 2 - You're able to use all uncommon chips and your mark is affixed to all items you craft.
- Level 3 - Combat Assist Modules have 14% less chance to fail when overcharging. / All weaponsmith outputs have 6% less chance to fail when overcharging. / Increases the number of rune slots that may appear on Combat Assist Modules. / Decreases the cost of Imbuements by 12%.
- Level 4 - Greatswords (Warrior), Claws (Stalker) & Shock Paddles (Medic) / Pistols (Spellslinger), Psyblades (Esper) & Heavy Guns (Engineer) receive a 6% increase to base charge capacity.
- Level 5 - You're able to use rare primary Resistor / Inductor / Capacitor chips.
- Level 6 - You're able to use rare secondary Resistor / Inductor / Capacitor chips.
- Level 7 - Reduces Cyclonite / Corium / Emberine / Marinax Acceleron requirements for all Weapon schematics by up to 2.
Armorer
- Level 1 - Chest & glove / Legs & boots / Head & shoulder designs receive a 5% increase to base charge capacity.
- Level 2 - You're able to use all uncommon chips and your mark is affixed to all items you craft.
- Level 3 - Special Ability Chips cost 8% less overcharge. / Imbuements cost 12% less overcharge. / Increases the overcharge capacities of shields by 10%.
- Level 4 - Increases the overcharge capacities of chest, head and gloves / shoulder, legs and boots by 10%.
- Level 5 - You're able to use rare primary Resistor / Inductor / Capacitor chips.
- Level 6 - You're able to use rare secondary Resistor / Inductor / Capacitor chips.
- Level 7 - Reduces Vitalium / Neurocite Ingot requirements for all Armorer designs by up to 2.
Outfitter
- Level 1 - XP gained from crafting failures increased by 8% / successes increased by 5%.
- Level 2 - You're able to use all uncommon chips and your mark is affixed to all items you craft.
- Level 3 - Adds a chance to increase the number of rune slots that may appear on crafted Support Systems. / Support Systems receive an 8% increase to base charge capacity. / Reduces charge penalty for mis-matching microchips by 10%.
- Level 4 - Chest & leg / Glove & boots / Head & shoulder guides receive a 5% increase to base charge capacity.
- Level 5 - You're able to use rare primary Resistor / Inductor / Capacitor chips.
- Level 6 - You're able to use rare secondary Resistor / Inductor / Capacitor chips.
- Level 7 - Reduces Tech / Sacred Leather requirements for all Outfitter guides by up to 2.
Technologist
- Level 1 - The cost to apply elemental water additives is reduced by 15%. / The cost to apply elemental earth additives is reduced by 15%. / When crafting medishots and boosts, targets are 10% easier to hit.
- Level 2 - The cost to apply elemental fire additives is reduced by 15%. / The cost to apply elemental air additives is reduced by 15%. / Medishots and Boosts have a 5% chance to reduce omniplasm costs to zero.
- Level 3 - You are now able to use an additional catalyst in your crafts.
- Level 4 - Discoveries are 20% easier to hit. / The number of Eldan relics required to create gadget reagents is reduced by 1. / The required omniplasm for extracting reagents from herbs is reduced by 1.
- Level 5 - Water / earth / air / fire additives are now 25% more powerful.
- Level 6 - Reagent outputs are increased by 50%. / The omniplasm cost of crafting Relic Parts is significantly lowered.
Architect
- Level 1 - Improves your ability to create Functional / Organic / Aesthetic / Synthetic designs.
- Level 2 - Discover schematics easier, and you can use an additional Catalyst. / Craft targets are easier to hit, and you can use an additional Catalyst. / Chance to return materials when crafting, and you can use an additional Catalyst.
- Level 3 - Chance to return ore and bonus experience when crafting Decor. / Chance to return ore and bonus experience when crafting FABkits. / Chance to return wood when crafting Decor and FABkits.
- Level 4 - Schematics require less wood / metal / cloth to craft. You may use an additional Catalyst.
- Level 5 - Functional / Organic / Aesthetic / Synthetic craft targets are easier to hit, and Functional / Organic / Aesthetic / Synthetic additives cost less.
Tailoring
- Level 1 - XP gained from crafting failures increased by 8% / successes increased by 5%.
- Level 2 - You're able to use all uncommon chips and your mark is affixed to all items you craft. (No choice of talents, and no I don't know what the mark thing means, sorry.)
- Level 3 - Special Ability Chips cause 8% less overcharge. / Mis-matching microchips cause 10% less overcharge. / Imbuements cause 13% less overcharge.
- Level 4 - Chest & glove / Leg & boots / Head & shoulder patterns receive a 5% increase to base charge capacity.
- Level 5 - You're able to use rare primary Resistor / Inductor / Capacitor chips.
- Level 6 - You're able to use rare secondary Resistor / Inductor / Capacitor chips.
- Level 7 - Reduces Smart / Glamer Cloth requirements for all Tailoring patterns by up to 2.
Anything Else?
There are a couple of things!
- Make sure you interact with and accept the quests from the tradeskill boards in villages and towns as these give excellent experience points.
- Remember you can only pick one talent per talent tier, so choose wisely as to how you craft and what will benefit you the most.
- Salvaging items you don’t need is a great way of obtaining items you can use in crafting.
- Remember that you can have 2 crafts at any one time but can also take up hobbies!
- Using your harvesting tool is much faster than attacking them with your weapons (Laser Pickaxe, Laser Chainsaw or Relic Blaster for Relic Hunters).
- There is Rune Crafting (available at level 15) which allows you to tweak your equipment even further, but we’ll cover that in a separate guide!
Thanks must go to Dealspwn for allowing me to use their image of Coordinate Crafting